Here's an easy winter project for anyone that wants to be able to check their outrigger set-up without the need to buy any expensive digital AoA device. You can measure the sponsons & strut AoA quite easy when it stands on the set-up board. Do note, the actual AoA reading will be slightly less when you do like me vs. if you turn it up-side-down and use an digital AoA device that you lay on the bottom of the sponson ride pads. That is due to the fact that when it stands on its own "feets" and with the normal weight of the RTR boat the sponson tubes gives/flexes a little... But that is the way it will do when running it also, right?
AoA info.
Nov 10: Updated at the bottom with AoA jig info and
link.

My set-up board is a 19 mm MDF board that I have cut to 1050x630mm size. You need to check what size is best for your boat(s). Mine is for 21 and 45 sized riggers. Holes are cut-out for the turn fin and rudder.

These are the AoA tools you need. The green tool is the one you use when checking the front sponson AoA. I made mine out of a fiber glass sheet that was 3.2 mm thick - perfect. But you can make your own tool gauge out of any flat material that is somewhat rigid like aluminum, carbon etc. The thickness must be either 3.0 or 3.2 mm though - columns for booth thicknesses is included in the chart. Make at least one long edge of the tool gauge straight and at 90 deg. Thats the edge you will push against the running surface of your front sponsons. Its easier if you make booth edges equally straight and true then you dont need to make sure you have the right edge.

This is the main chart measure for checking the front sponson AoA. Print it out at
1:1/100% size and cut the three different "parts" out with a pair of scissors. The little one on the bottom is a base measure "chart" that you use when checking low degree AoA's as in strut and rear sponsons etc...
When you have printed it out on a laser printed double check the base line measurements that is in the charts so they actually are at 20/30/40/50/60/70 mm from the base line. If not you have not printed it out correctly and the AoA's will not be correct.
After cutting them out its best to cover them with some plastic laminate so they will last a while.
Do note, dont use the gif picture here above - thats not in scale!
Click
HERE to download the pdf file that you will print out. Or check to the right in the download list -> where its linked also (Sponson AoA Measure PDF).

Now stand the rigger on the set-up board with a laminated (or not) chart including the small one for the strut (so its level and on the right height on all corners). Align the trailing edge of your front sponson ride pads to the base line of the chart - see the above picture.
Do note, for these AoA charts to work - the bottom of your sponsons must be perfectly straight and true for at least the last 70 mm toward the TE. If the ride pads are convex or concave you cant measure the AoA like this, in fact if that is the case its difficult to measure the AoA at all...

Then you use your newly made tool gauge that is either 3.0 or 3.2 mm thick and lay it on the chart in front of the sponson to be measured. Then push it carefully back until it touches the bottom of the sponson. Make sure the gauge tool is aligned and parallel to the lines in the chart. Read the AoA to either the left or right column depending on if your tool is 3.0 or 3.2 mm thick. In this case the AoA is 3.59 degrees as my tool gauge is 3.2 mm thick.
Also note the fact that the sponson AoA charts are made to be read on booth left and right hand side of the chart. The lines are separated in 1 mm segments so the text would have been unreadable if made to be read on one side only so to speak. If you check the charts carefully you will know what I mean... :)

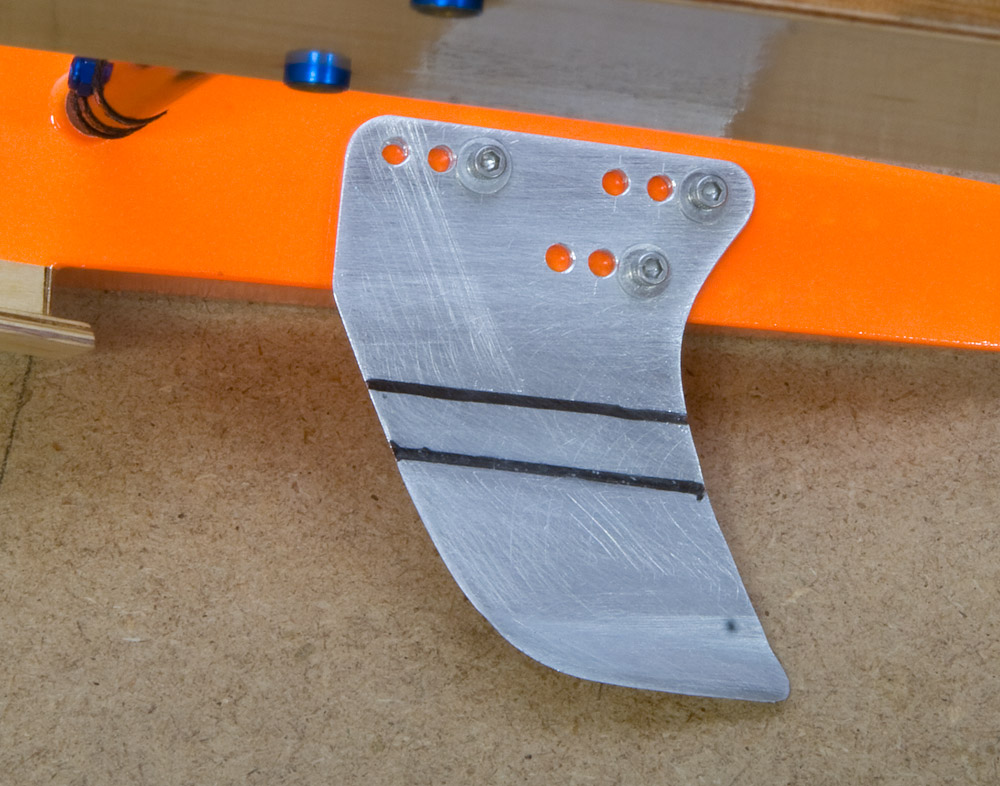
With a set-up board its also easy to check the turnfin angle. First I make a line with a permanent market at the first bend. That bend I want to have perfectly horizontal = not angle up or down.

Set your rigger on your new set-up board and use a steel ruler and the permanent marker again and draw a second line that now is perfectly on the water edge level.

Now you easily can see if your turn fin is pulling down or lifting. As a base set-up the two lines should to be parallel. Make adjustments and wipe off the top line with denatured alcohol and re-do the last step until you're satisfied with its angle.

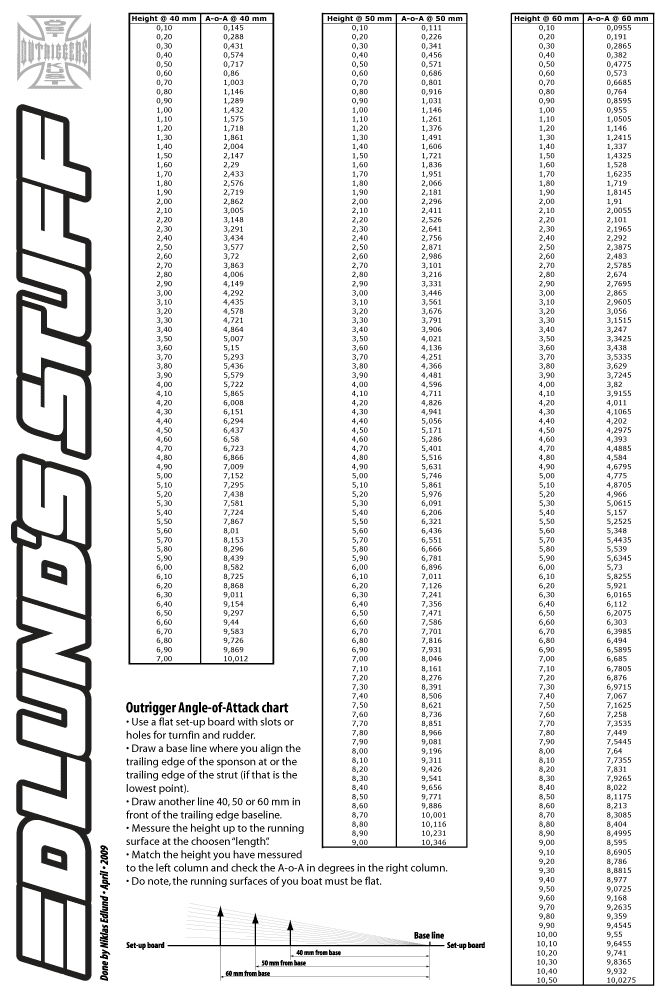
In
April 2009 I published this AoA chart that you can use to measure AoA angles of a rigger also. The chart is made the other way around so to speak if you compare it to the chart where you use a set-height measuring tool gauge (as with the front sponsons). Here you actually measure the height at a given length away from a base line. Thats perfect for smaller AoA angles as in the strut and rear sponsons...
Click
HERE for download of this AoA chart.

Place your rigger on the set-up board and align the small chart with the strut rear edge at the base line. As this is a .21 rigger I will be measuring at the 40 mm mark.

Use a set of feeler gauge blades and slide them under the strut from the front until they stop at the 40 mm mark. In this case it was 1.00+0.15 mm that was needed.

If you take your printed out AoA chart you can see that 1.15 mm would be just between the 1.10 and 1.20 mm heights = 1.64 degrees of negative AoA on this strut...
That wasnt that hard was it? :)
You can of course use the same chart to measure the AoA of the rear sponsons also.
 In July
 I published an article about sponson tape and how to make a rear sponson mounting jig. Thats the jig you see in the picture here above. The AoA PDF chart is used in this case also to calculate how thick the spacer blocks should be to give an preferred AoA of the jig. Click
HERE for that article and more info.
Good luck measuring and have a nice weekend!
/Niklas